From NCCL to DTensor: A Deep Dive into PyTorch Distributed Internals
Training modern AI models is an exercise in orchestration. As models scale beyond the memory limits of a single GPU, we rely on distributed training. But how does a Python call like dist.all_reduce actually move bytes across an InfiniBand cable?
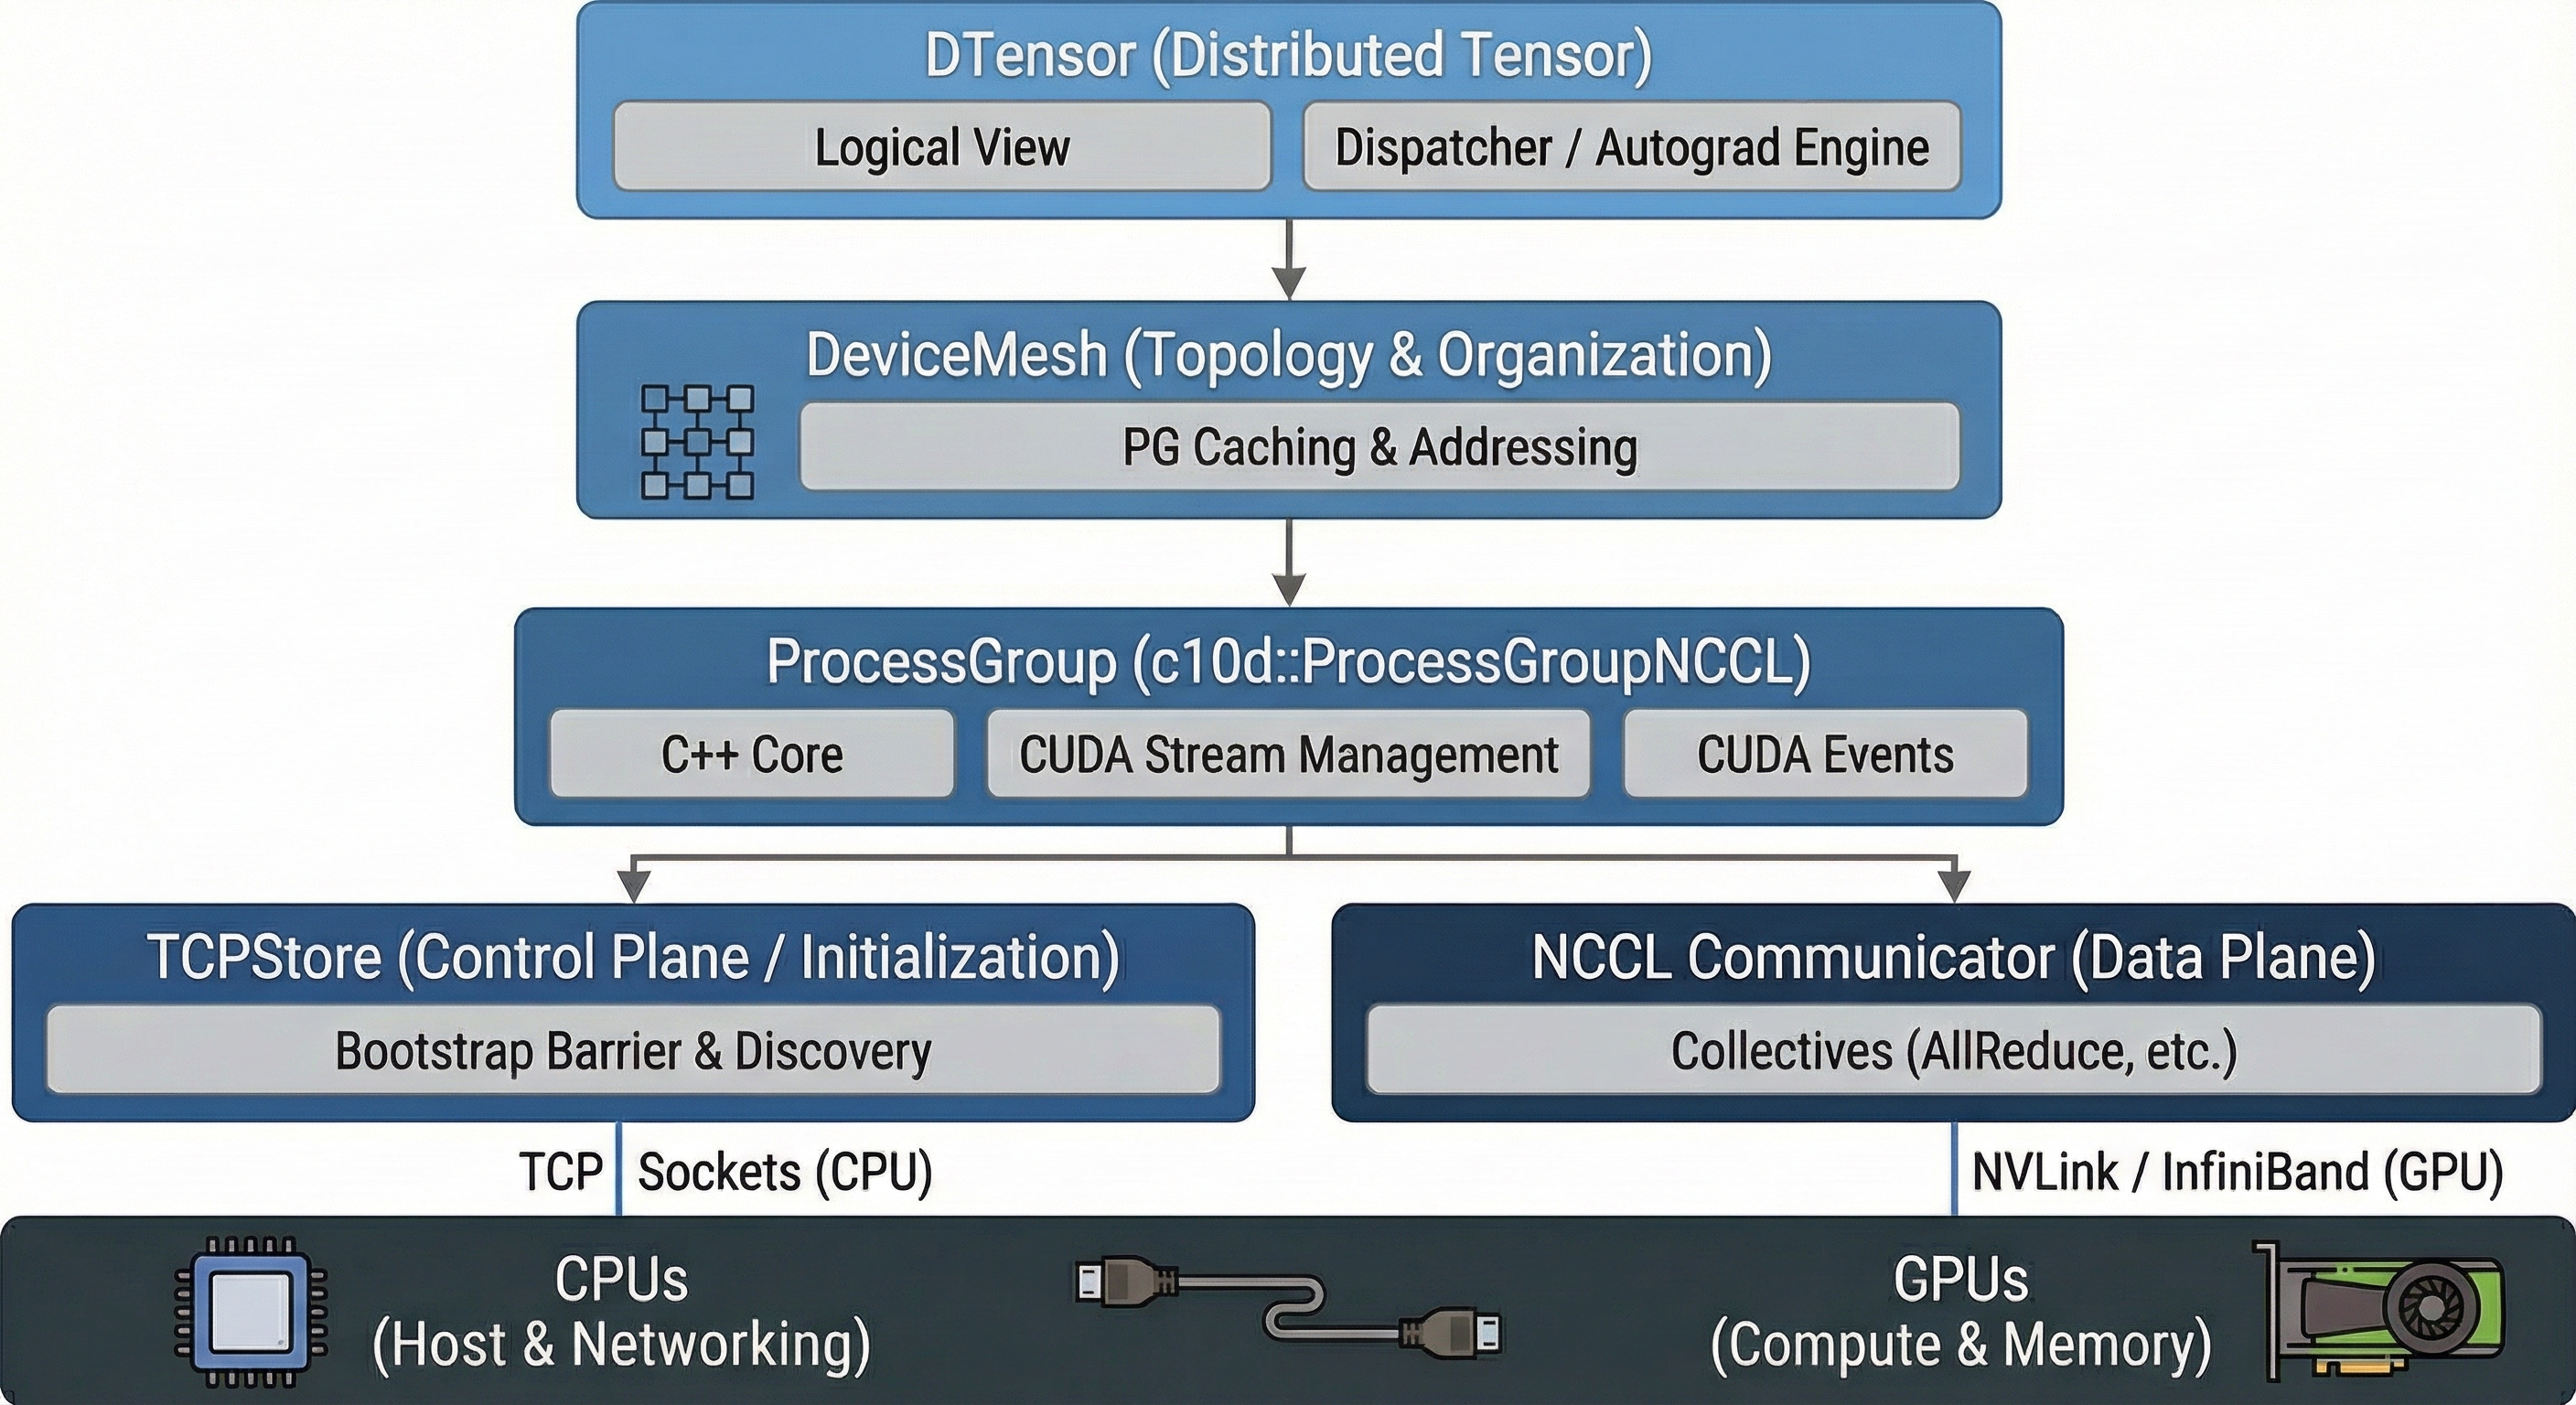
This post dissects the PyTorch distributed stack, moving from the bare-metal C++ bindings of NCCL up to the compiler-like dispatch logic of DTensor.
1. Initialization: How PyTorch Creates a Process Group
The creation of a distributed training setup typically starts with dist.init_process_group(). This function orchestrates a two-phase handshake: first, processes must discover each other (Rendezvous), then PyTorch instantiates the actual communication backend.
The Rendezvous Phase
Before processes can communicate, they need to find each other. PyTorch uses a Store (usually a TCPStore) to exchange IP addresses and ports.
- Rank 0 as the Coordinator: Rank 0 starts a TCP server at a specified
MASTER_ADDRandMASTER_PORT(typically set via environment variables). - Peer Discovery: All other ranks connect to Rank 0 and write their connection information (hostname, port) into the Key-Value Store.
- Barrier Completion: Once all expected ranks (defined by
world_size) have checked in, the “Rendezvous” is complete. This is often implemented as an atomic counter in the store that each rank increments.
# Typical environment setup for distributed training
# MASTER_ADDR=10.0.0.1 MASTER_PORT=29500 RANK=0 WORLD_SIZE=8 python train.py
import torch.distributed as dist

dist.init_process_group(
    backend="nccl",
    init_method="env://",  # Reads MASTER_ADDR, MASTER_PORT from environment
    world_size=8,
    rank=0
)
Deep Dive: TCPStore (The Control Plane)
The TCPStore is the phone book of the distributed system. It is a persistent Key-Value store based on simple TCP sockets. It runs entirely on CPUs and uses standard system memory—no GPU involvement at this layer.
Internal Implementation
Server (Rank 0): When initialized on Rank 0,
TCPStorecreates a C++ thread that binds a socket toMASTER_ADDR:MASTER_PORTand listens for incoming connections. It runs an event loop handling requests likeSET,GET,ADD, andWAIT.Clients (Rank 1+): Other ranks instantiate a
TCPStoreclient which initiates a blockingconnect()syscall to the Master’s IP/Port.
┌─────────────────────────────────────────────────────────────┐
│                     TCPStore Architecture                    │
├─────────────────────────────────────────────────────────────┤
│                                                             │
│   Rank 0 (Server)              Ranks 1-N (Clients)          │
│   ┌─────────────────┐          ┌─────────────────┐          │
│   │  TCPStore       │◄─────────│  TCPStore       │          │
│   │  Server Thread  │  TCP     │  Client         │          │
│   │                 │◄─────────│                 │          │
│   │  KV HashMap:    │          └─────────────────┘          │
│   │  {              │          ┌─────────────────┐          │
│   │   "nccl/uid":.. │◄─────────│  TCPStore       │          │
│   │   "barrier":2   │  TCP     │  Client         │          │
│   │  }              │          └─────────────────┘          │
│   └─────────────────┘                                       │
│                                                             │
└─────────────────────────────────────────────────────────────┘
The PrefixStore Wrapper
You might see PrefixStore in stack traces. This is a namespace wrapper around the
TCPStore. When you create a sub-group (e.g., specific to 4 out of 8 GPUs), PyTorch wraps the
global store in a PrefixStore (e.g., adding group_1/ to all keys) so that different process
groups don’t accidentally overwrite each other’s metadata. This enables multiple Process Groups to coexist without key collisions. (We’ll explore the ProcessGroup abstraction in detail in Section 2.)
# Internally, PyTorch does something like:
prefix_store = PrefixStore("pg_rank_0_1_2_3/", global_tcp_store)
# Now all keys are namespaced: "barrier" becomes "pg_rank_0_1_2_3/barrier"
How barrier() is Implemented
There are actually two types of barriers in PyTorch Distributed, and they use completely different mechanisms.
A. The “Bootstrap” Barrier (Store-Based)
This happens inside init_process_group to ensure the group is fully formed before any collective operations begin.
Mechanism: It uses the TCPStore’s atomic counters.
The Dance:
- Each process calls
store.add("init_barrier", 1)— atomically incrementing a counter. - Each process then calls
store.wait(["init_barrier"], target_value=WORLD_SIZE). - The Store blocks the request until the counter hits the target (meaning everyone has arrived), then releases all processes simultaneously.
# Simplified pseudocode of the bootstrap barrier
def bootstrap_barrier(store, world_size):
    store.add("init_barrier", 1)  # Atomic increment
    store.wait(["init_barrier"], world_size)  # Block until count == world_size
B. The “Runtime” Barrier (NCCL-Based)
When you call dist.barrier() during training, it does not use the TCPStore. Instead, it performs an actual NCCL collective operation.
Mechanism: PyTorch implements barrier() on GPUs by invoking ncclAllReduce on a tiny dummy tensor (often just 1 byte).
Why? This synchronizes the GPU streams, ensuring all preceding GPU operations have completed across all ranks. A CPU-only TCPStore barrier wouldn’t guarantee GPU work is finished.
# What dist.barrier() actually does for NCCL backend (simplified)
def barrier():
    dummy = torch.zeros(1, device="cuda")
    dist.all_reduce(dummy, op=dist.ReduceOp.SUM)
    # All ranks block until this AllReduce completes
Backend Instantiation
Once the ranks know each other’s network locations, PyTorch creates the actual ProcessGroup object based on the requested backend:
| Backend | Use Case | Transport |
|---|---|---|
| NCCL | GPU-to-GPU communication | NVLink, InfiniBand (RoCE/IB Verbs) |
| Gloo | CPU communication or fallback | TCP, shared memory |
| MPI | HPC environments | Vendor MPI implementations |
Note: You can also initialize multiple backends simultaneously. A common pattern is using NCCL for gradient synchronization and Gloo for CPU-based metadata exchange.
2. The Foundation: torch.distributed & The C++ Core
At the bottom of the stack lies the Process Group (PG). While Python users see torch.distributed.ProcessGroup, this is merely a wrapper around the C++ class c10d::ProcessGroup.
The Backend: ProcessGroupNCCL
When you initialize a group with the NCCL backend, PyTorch instantiates c10d::ProcessGroupNCCL. This object manages the lifecycle of the NCCL Communicator (ncclComm_t).
Key Implementation Detail: The CUDA Stream
Critically, ProcessGroupNCCL maintains its own dedicated CUDA Stream for communication, separate from your default compute stream.
- Execution: When you call
all_reduce, PyTorch enqueues the NCCL kernel onto this communication stream. - Synchronization: To ensure safety without stalling the CPU, PyTorch uses CUDA Events.
- Pre-op: A record event on the compute stream is waited on by the NCCL stream (wait for data to be ready).
- Post-op: A record event on the NCCL stream is waited on by the compute stream (wait for communication to finish).
The Handshake: How TCPStore Bootstraps NCCL
Before NCCL can form its high-speed rings or trees, it needs a “bootstrapping” phase using standard TCP sockets. This is the role of the TCPStore.
- Unique ID Generation: Rank 0 calls the NCCL C API
ncclGetUniqueId(). This generates a struct containing the host’s IP and an internal random key. - The Exchange: Rank 0 pushes this ID to the
TCPStore(a C++ Key-Value store running on the master node). - Blocking Wait: Ranks 1-N connect to the TCPStore and perform a blocking
GETon this key. - Communicator Initialization: Once all ranks possess the ID, they call
ncclCommInitRank, which establishes the actual NVLink/InfiniBand connections.
Technical Note: The “Bootstrap Barrier” you often see at startup is implemented via atomic counters in the TCPStore. Every rank increments a key (e.g., init/cnt), and waits until the value equals WORLD_SIZE.
3. The Organizer: DeviceMesh Internals
PyTorch DeviceMesh acts as a higher-level manager that automates the creation and organization of Process Groups (PGs). While a standard Process Group is a flat list of ranks (e.g., [0, 1, 2, 3]), a DeviceMesh structures these ranks into an N-dimensional grid, enabling complex topologies like “Data Parallelism across nodes” and “Tensor Parallelism within nodes.”
The Core Data Structure: The Grid
At its heart, a DeviceMesh contains an N-dimensional tensor (on the CPU) where:
- Indices (Coordinates): Represent the logical position in the cluster (e.g., Node 0, GPU 3).
- Values: Represent the global Rank IDs (e.g., Rank 3).
# Creating a 2x4 mesh for 8 GPUs across 2 nodes
mesh = init_device_mesh("cuda", (2, 4), mesh_dim_names=("dp", "tp"))

# Internally, this creates a tensor like:
# tensor([[0, 1, 2, 3],    <-- Node 0
#         [4, 5, 6, 7]])   <-- Node 1
Implementation: The “Slicing” Algorithm
When you initialize a DeviceMesh, it doesn’t just create one big group. It automatically creates multiple orthogonal Process Groups, one for each dimension of the mesh.
Given a mesh of shape (2, 4) (2 nodes, 4 GPUs each):
                        Dim 1 (Tensor Parallel)
                    ─────────────────────────────►

              ┌─────────┬─────────┬─────────┬─────────┐
              │         │         │         │         │
     Node 0   │ Rank 0  │ Rank 1  │ Rank 2  │ Rank 3  │  ◄── Row Group [0,1,2,3]
              │         │         │         │         │
        │     ├─────────┼─────────┼─────────┼─────────┤
 Dim 0  │     │         │         │         │         │
 (Data  │     │ Rank 4  │ Rank 5  │ Rank 6  │ Rank 7  │  ◄── Row Group [4,5,6,7]
Parallel)     │         │         │         │         │
        ▼     └─────────┴─────────┴─────────┴─────────┘
     Node 1        │         │         │         │
                   ▼         ▼         ▼         ▼
                Column   Column   Column   Column
                Group    Group    Group    Group
               [0,4]    [1,5]    [2,6]    [3,7]
The implementation iterates through every dimension and creates subgroups (using dist.new_group) for devices that share the same coordinate on that axis:
Dim 0 Slicing (Vertical / Column-wise): PyTorch creates PGs for ranks that share the same column index:
[0, 4],[1, 5],[2, 6],[3, 7]. These groups enable communication between nodes (e.g., for FSDP gradient sync).Dim 1 Slicing (Horizontal / Row-wise): PyTorch creates PGs for ranks that share the same row index:
[0, 1, 2, 3],[4, 5, 6, 7]. These groups enable communication within a node (e.g., for Tensor Parallelism).
The Result: Every single rank now holds references to two distinct ProcessGroup objects (one for Dim 0, one for Dim 1), but the user only manages one DeviceMesh object.
Coordinate System & Rank Lookup
DeviceMesh implements a coordinate system that maps global ranks to mesh positions:
- Global Rank 5 knows its mesh coordinate is
(1, 1)(Row 1, Column 1). - When a collective operation is requested on “dimension 0” (the vertical axis), Rank 5 looks up its cached Process Group for Dim 0 (which contains ranks
[1, 5]) and dispatches the NCCL call on that specific group.
Code Representation
Roughly speaking, the internal logic looks like this (simplified pseudo-code):
class DeviceMesh:
    def __init__(self, mesh_tensor):
        self.mesh = mesh_tensor
        self._dim_groups = {}  # Stores PGs for each dimension

        # Iterate over every dimension (e.g., 0 and 1)
        for dim in range(mesh.ndim):
            # 1. Slice the mesh along this dimension to find peer ranks
            for idx in range(mesh.shape[dim]):
                # Get all ranks along this slice
                group_ranks = mesh.select(dim, idx).flatten().tolist()

                # 2. Call the underlying c10d API to form the PG
                # This is where it connects to NCCL/Gloo
                pg = dist.new_group(ranks=group_ranks)

                # 3. Cache this PG for the current rank
                if my_global_rank in group_ranks:
                    self._dim_groups[dim] = pg
Why DeviceMesh Over Raw Process Groups?
Without DeviceMesh, implementing “2D Parallelism” (e.g., FSDP + TP) requires manual “PG Arithmetic”:
- Calculate that
Rank 5needs to talk toRank 1for FSDP. - Calculate that
Rank 5needs to talk toRank 4, 6, 7for TP. - Manually instantiate
dist.new_groupfor every permutation. - Pass the correct group object to every collective call.
With DeviceMesh: You simply pass mesh and specify mesh_dim=0 or mesh_dim=1. The DeviceMesh abstraction looks up the correct underlying cached ProcessGroup and dispatches the NCCL call automatically.
# Without DeviceMesh: manual group management
tp_group = dist.new_group([4, 5, 6, 7])  # Must calculate manually
dp_group = dist.new_group([1, 5])         # Error-prone for complex topologies
dist.all_reduce(tensor, group=tp_group)

# With DeviceMesh: declarative and automatic
mesh = init_device_mesh("cuda", (2, 4), mesh_dim_names=("dp", "tp"))
dist.all_reduce(tensor, group=mesh.get_group("tp"))  # Just name the dimension
Optimization: These subgroups are cached at initialization. When you perform an operation on a mesh dimension, DeviceMesh performs an O(1) lookup to retrieve the pre-initialized ProcessGroup corresponding to the current rank’s slice.
4. The Data Abstraction: DTensor & The Dispatcher
DTensor is the most sophisticated layer. It decouples the Logical View (the global math) from the Physical View (the local memory). It achieves this by hooking into the PyTorch Dispatcher.
Creating DTensors from a DeviceMesh
DTensor combines a DeviceMesh with Placements to describe how data is distributed. There are three primary placement types:
| Placement | Description | Example |
|---|---|---|
Shard(dim) | Tensor is split along dimension dim across devices | A [1024, 512] tensor sharded on dim 0 across 4 GPUs → each holds [256, 512] |
Replicate() | Full tensor is copied on every device | All 4 GPUs hold the complete [1024, 512] tensor |
Partial() | Each device holds a partial sum (pre-reduction) | Used internally during gradient accumulation |
import torch
from torch.distributed.tensor import DTensor, Shard, Replicate
from torch.distributed.device_mesh import init_device_mesh

# Create a 1D mesh with 4 GPUs
mesh = init_device_mesh("cuda", (4,))

# Method 1: Distribute an existing tensor
global_tensor = torch.randn(1024, 512, device="cuda")
dtensor = DTensor.from_local(
    global_tensor,
    device_mesh=mesh,
    placements=[Shard(0)],  # Shard along first dimension
)
# Each GPU now holds a [256, 512] slice

# Method 2: Create a sharded tensor directly (more memory efficient)
# Each rank only allocates its local shard - no global tensor ever exists
dtensor = DTensor.from_local(
    torch.randn(256, 512, device="cuda"),  # Local shard only
    device_mesh=mesh,
    placements=[Shard(0)],
    run_check=False,  # Skip global shape validation for speed
)

# Method 3: Use factory functions (allocates based on placement)
dtensor = torch.zeros(1024, 512, device_mesh=mesh, placements=[Replicate()])
# Creates a replicated tensor: all 4 GPUs hold the full [1024, 512]
For 2D parallelism with a 2D mesh, you specify a placement per mesh dimension:
# 2D mesh: 2 nodes × 4 GPUs per node
mesh_2d = init_device_mesh("cuda", (2, 4), mesh_dim_names=("dp", "tp"))

# Shard on both dimensions: [8192, 4096] global → [4096, 1024] per GPU
dtensor_2d = DTensor.from_local(
    torch.randn(4096, 1024, device="cuda"),
    device_mesh=mesh_2d,
    placements=[Shard(0), Shard(1)],  # Shard dim 0 on "dp", dim 1 on "tp"
)
print(f"Logical shape: {dtensor_2d.shape}")  # [8192, 4096]
print(f"Local shape: {dtensor_2d.to_local().shape}")  # [4096, 1024]
How DTensor Automates Communication
DTensor automates communication by hooking into PyTorch’s Dispatcher. It intercepts standard PyTorch operations and translates them into “Distributed” operations using a process called SPMD Expansion (Single Program, Multiple Data).
Here is the step-by-step lifecycle of a DTensor operation (e.g., z = torch.matmul(x, y)):
Step 1: Interception (Dispatch)
When you call matmul on a DTensor, the Python call hits the __torch_dispatch__ hook. PyTorch realizes, “These aren’t normal tensors; they are DTensors,” and pauses execution to check the rules.
Step 2: Propagation Rules (Compile-Time Logic)
DTensor looks up a Sharding Propagator for matmul. It asks:
If
xis Sharded on Col 0, andyis Sharded on Row 0, what is the valid placement for outputz?
PyTorch maintains a rulebook for every operator (Linear, Conv2d, ReLU, etc.) that defines valid input/output placement combinations.
Step 3: Communication Injection
If the current placements of x and y don’t match a valid rule for matmul, or if the rule dictates a change in state (like producing a Partial result), DTensor automatically injects the necessary collective communication.
- Example 1 (Re-sharding): If
xisShard(0)but the op requires it to beReplicate(), DTensor silently triggers anall_gatherbefore the math happens. - Example 2 (Reduction): If
xandyare sharded such that the dot product produces partial sums (e.g., Tensor Parallelism), the outputzis initially marked asPartial(). When you try to usezlater, or if you force it, DTensor automatically triggers anall_reduceto sum the partial results.
Step 4: Local Execution
Once the communication is finished and data is in the right shape, DTensor extracts the local tensor from x and y, runs the standard local torch.matmul kernel on the GPU, and wraps the result in a new DTensor.
Concrete Example: Tensor Parallel Linear Layer
Let’s see how this automation replaces manual code for a Matrix Multiplication $Y = XW$.
Scenario: We want to shard the Weight $W$ across GPUs (Tensor Parallelism).
Setup:
- Input $X$:
Replicate()(Available on all GPUs). - Weight $W$:
Shard(1)(Column-wise sharding).
- Input $X$:
The Operation:
out = torch.matmul(X, W)DTensor Automation:
- Rule Check: The propagator sees $X$ is replicated and $W$ is sharded on columns.
- Math Logic: A “Replicated Matrix” × “Column-Sharded Matrix” results in a “Column-Sharded Matrix”.
- Execution: Each GPU computes its local chunk: $Y_{\text{local}} = X \times W_{\text{local}}$.
- Result: The output
outis automatically tagged asShard(1). No communication was needed yet.
Next Operation:
y = out.sum()ory = out.view(...)- If the next op requires the full tensor, DTensor sees
outisShard(1). It automatically inserts anall_gatherto stitch the columns back together before proceeding.
- If the next op requires the full tensor, DTensor sees
The Autograd Engine: Differentiable Communication
DTensor is fully differentiable. The communication primitives (Redistribute) define backward functions.
- Forward:
Shard(0) -> Replicate()triggers an AllGather. - Backward: The gradient flow requires the reverse: ReduceScatter (summing gradients from all replicas and splitting them back to shards).
This symmetry is handled automatically by the autograd engine, meaning you can train distributed models without writing a single line of gradient synchronization code.
Summary: Manual vs. DTensor
| Feature | Without DTensor (Manual) | With DTensor |
|---|---|---|
| Data View | You manage rank_0_chunk, rank_1_chunk. | You see one global Tensor (logical view). |
| Math | local_x @ local_w | global_x @ global_w |
| Comms | You manually call dist.all_reduce(tensor). | DTensor calls it automatically when the graph requires it. |
| Backprop | You must manually handle gradient syncing. | DTensor’s Autograd engine automatically handles the backward pass communication. |
5. Code Example: “The Right Way” (Efficient Initialization)
This script demonstrates the production-ready pattern: Local-First Initialization. We avoid allocating the full global tensor on any single device.
import os
import torch
import torch.distributed as dist
from torch.distributed.tensor import DeviceMesh, DTensor, Shard, Replicate, Partial

def run_dtensor_deep_dive():
    # 1. Low-Level Setup
    dist.init_process_group(backend="nccl")
    rank = int(os.environ["RANK"])
    torch.cuda.set_device(rank)

    # 2. Topology Construction
    # We create a 2x2 mesh. Under the hood, this triggers 'dist.new_group'
    # multiple times to create the row-wise and column-wise communicators.
    mesh = DeviceMesh("cuda", torch.arange(4).reshape(2, 2))

    # 3. Efficient "Local-First" Initialization
    # Instead of creating a massive 4x4 tensor and slicing it,
    # each rank allocates ONLY its 2x2 slice.
    local_data = torch.randn(2, 2, device="cuda")

    # We inform DTensor: "This local 2x2 chunk is actually a shard
    # of a global 4x4 tensor, split across both dimensions."
    dtensor = DTensor.from_local(
        local_data,
        mesh,
        [Shard(0), Shard(1)],
        run_check=False # Skip global consistency check for speed
    )

    if rank == 0:
        print(f"[Init] Logical Shape: {dtensor.shape} | Physical Shape: {local_data.shape}")

    # 4. The Dispatcher in Action: Implicit Communication
    # We want to perform a MatMul.
    # We create a second DTensor that is Replicated (exists fully on all GPUs).
    # Note: 'zeros' factory here allocates locally based on the mesh placement!
    weight = torch.distributed.tensor.zeros(
        (4, 4),
        device_mesh=mesh,
        placements=[Replicate(), Replicate()]
    )

    # EXECUTION:
    # 1. Dispatcher sees: Shard(0),Shard(1) @ Replicate,Replicate
    # 2. Rule: To multiply, we need compatible inner dimensions.
    # 3. Action: The dispatcher may trigger an AllGather on 'dtensor' dim 1
    #    to make the dot product valid.
    # 4. Result: A DTensor with a new placement (likely Shard(0), Replicate).
    output = torch.matmul(dtensor, weight)

    # 5. Explicit Communication via State Transition
    # "I want to force this output to be fully replicated on all GPUs."
    # Transition: Shard(0) -> Replicate() ==> Triggers AllGather
    final_result = output.redistribute(mesh, [Replicate(), Replicate()])

    dist.destroy_process_group()

if __name__ == "__main__":
    run_dtensor_deep_dive()
Summary of the Stack
- NCCL: Moves the bytes via specific hardware lanes.
- ProcessGroup: Manages the C++ threads, CUDA streams, and event synchronization.
- DeviceMesh: Maps logical grid coordinates to specific Process Groups.
- DTensor: Intercepts Python operators to inject the correct communication (NCCL calls) just-in-time, keeping the math correct and the gradients flowing.